Showing posts with label recipe. Show all posts

Monday, February 10, 2014

Crispy Tofu & Chicken Dumplings


I love dumplings. Wontons, siomai, gyoza, mandu, whatever you call it, I love them. We had a slight blunder in ordering chicken delivery (what we got was super-spicy fried chicken). There were only a couple of pieces that were eaten from that order so I decided to strip the meat from the bones and chopped it up. I figured I could use it in burritos, quesadillas or even dumplings. I decided to do the latter.

Fried Tofu and Chicken Dumplings

Ingredients:
1 pack dumpling wrappers 
2 cups chopped cooked chicken
1 cup crumbled tofu (firm variety)
1 egg
2 tablespoons grated carrots
1/4 cup grated onions
1 teaspoon minced garlic
2 tablespoons soy sauce
salt & pepper

oil for frying

Directions:
1. Combine all the listed ingredients (except for the oil) in a large mixing bowl. Salt and pepper the mixture to taste. Make sure everything is well combined.
2. Take one dumpling wrapper and place a tablespoon of the mixture in the middle, seal up the edges with egg white (the best "glue" to seal your dumplings). Set aside on a plate.
3. Do the rest for all the wrappers and mixture.
4. Prepare your steamer and steam the dumplings for about 5-7 minutes. Remember, these will be fried later.
5. When all the dumplings are cooked, take them out and let them cool on a plastic-lined tray (or oiled, so that the dumplings don't stick to the surface).
6. Heat about 1/2 cup of oil in a deep frying pan. Put the heat to medium and drop dumplings one by one. When one side gets golden-brown (about 1-2 minutes) flip them over and fry that side. Take out the dumplings and put them on papertowels to drain.

Serve hot with your preferred dip: ketchup, soysauce with vinegar, chili-garlic sauce, etc.


I tried one, it was amazing!

I fried a couple to test them out. They were amazing! The first bite was crunchy and then the filling was good and savory. It went well with my soup and tofu salad meal for lunch. If you can see below the filling turned out nice and done. If you plan to freeze them, do it on a tray first (spaced apart, not touching together). Then once it's frozen, just take them out and let thaw a bit and fry them. 


This was a serendipitous recipe borne out of a botched chicken order. I can't wait to have these again tomorrow for a late afternoon snack.

Thursday, February 6, 2014

Egg Drop Soup for a Sick Boy

A couple of weeks ago, my eldest son and I had the cold virus. After a week's rest and a gazillion of horse pills from my doctor, I am finally over my cold. Eldest son is still coughing a little but it looks like he's getting over it soon. The bad news is, my youngest son Billy woke up with a slightly sore throat. He still went to school because he thought it will be gone after a couple of hours. When he came home, the sore throat had worserned and he had a raging headache.

I knew Billy was sick when he wasn't hungry after coming home from school. He always ate a big snack (growing boy = Bottomless Pit). He promptly headed to his room and laid down. For dinner, he asked if he can have some soup. When I asked him what he wanted, he replied he wanted some of my Egg Drop Soup. Thank goodness I just made some chicken broth the previous day. I had everything in my refrigerator for the soup.

Egg Drop Soup

Ingredients:
2 cups chicken broth
1 egg, lightly beaten
1 tsp. grated ginger
1 tablespoon finely minced white onion
1/4 cup cornstarch mixed with 1/4 cup water
1 tsp. finely chopped spring onion or chives *(optional)
salt & pepper to taste


Directions:
1. Boil the chicken broth in a large sauce pan or a small pot. When it starts to simmer, add the ginger and onion.
2. Let it simmer for five minutes. Taste the broth, if it needs it, salt it to your liking.
3. Bring it to a boil and add the cornstarch slurry that you made with the cornstarch and water. Add the slurry slowly in a thin stream while slowly stirring the soup. If you see the soup thicken up to your liking, stop pouring the cornstarch mix.
4. Turn the heat down and let the soup simmer for about a minute. Turn the heat off and slowly drop in the beaten egg. While you are pouring the egg, use your ladle to stir the soup to create wispy feathers of egg throughout the soup.
5. Ladle into individual bowls and sprinkle with black pepper and chopped spring onions/chives.

Sunday, April 5, 2009

Guinataang Baboy (Pork Stewed in Coconut Milk)


Now I've always been saying that Filipinos love their pork. One of the many ways we enjoy our pork is stewed in coconut milk. There is actually a province in the Philippines that specializes in everything cooked with coconut milk - the Bicol province. That province is also known for its fiery, hot chili-spiced dishes. Anyway, I digress. Here is a quick and easy recipe for Guinataaang Baboy or Pork Cubes Stewed in Coconut Milk.

"Guinataan" means cooked with coconut milk. It can be a savory dish like Guinataang baboy or Guinataang Isda (Fish Coconut Stew) or it can be a sweet dish like the common afternoon snack just simply called "Guinataan". The latter contains cubes of plantains, sweet potato, rice balls, slices of jackfruit, etc. So, keep that in mind whenever you come across the word - Guinataan.

Now, onto the recipe. You'll need:

Ingredients
1/2 kilo (or 1 pound) Pork cubes (preferably with some fat on some pieces)
3-4 cups of water
1 coconut, grated and then extracted (milk)++
1/2 onion, sliced
4-5 cloves of garlic, coarsly minced
1 red bell pepper, seeded, cored and sliced into 1-inch squares
5-6 pieces of yard long beans, cut into 2-inch pieces
3-4 pieces of green chilis (the mild, sweet kind)***
Optional: cubes of carrot (which I added for a nice touch of color) and potatoes.

++Substitute a can of coconut milk or two pouches of powdered coconut milk mixed with 2 cups of water.
***If you like your stews fiery-hot, substitute habaneros or other hot chilis of your choice.

1. In a wok or deep pan, add the water and pork. Cook for about 30 to 45 minutes or until the pork has become tender.

2. Take out the pork stock and set it aside for other dishes. Take out the pork and set it aside. Put a little oil on the pan and heat it until hot.

3. Add the garlic and cook until it is golden brown. Add the onion slices and cook until they are translucent (about 2 minutes). Add the green beans, carrot and potato cubes too.

4. Add the cooked pork and saute until the pork edges turn brown. Add the coconut milk and turn down the heat to low. Add the green chilis (sliced if you like or cut in half) and bell pepper.

5. Simmer for 10 to 15 minutes or until the coconut milk turns thick and saucy.

Serve hot with freshly cooked rice. This also makes a perfect side dish to a fried fish meal like what I had for lunch today.

Sunday, March 29, 2009

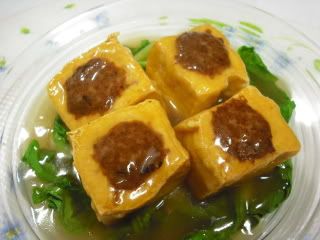
Stuffed Tofu


Here's a great recipe for those of you who are left with a block of tofu sitting in the fridge. I mean, who can eat all that tofu? I remembered there was a Chinese recipe of hollowing out tofu blocks, stuffing it with meat and deep-frying it. Lastly, the golden-crunchy blocks are covered with sauce.

The result? Crispy tofu with soft, creamy meaty innards. Your block of tofu will be gone in no time.

Recipe:

1 block firm tofu
1/2 cup ground meat (pork, chicken or beef)
1/4 cup finely minced carrot
2 mushrooms, finely minced
1/4 cup finely minced onion
1 garlic clove, finely minced
2 sprigs of spring onion, minced
1 egg
1 cup cooking oil

Sauce ingredients:
1 cup chicken broth (or vegetable broth)
1 tablespoon corn starch
1 tablespoon oyster sauce

1. Combine ground meat with egg, carrots, mushrooms, onion, garlic and spring onions. Salt and pepper the mixture and set aside.

2. With a sharp knife, cut the tofu into 8 blocks. Take a small spoon and hollow out the center of each tofu block. Be careful as not to pierce a hole in it.

3. Take your stuffing and stuff the holes that you carved out. If you have leftover meat stuffing, combine it with the tofu pieces that you took out of the blocks and you can fry these as fritters.

4. In a deep pan or wok, heat the oil until it is very hot. Carefully place the stuffed tofu (meat side down) on the pan and fry until all the sides are golden. Take these out and let drain on paper towels.

5. In the same pan, take out the oil and wipe the pan down. Heat it up again and in a bowl combine all the sauce ingredients. Put the mixture in the pan and stir like crazy. When the sauce gels up, add the fried tofu blocks and let everything get covered in the sauce. Serve hot as a side dish.

Saturday, February 7, 2009

Another Deokkbokki Recipe (Korean Rice Cakes in Sweet-Savory Sauce)

I have blogged about making Korean Rice Cakes in Red Pepper Sauce (Deokkbokki) in my first blog. You can read it here. This kind of spicy deokkbokki is the most popular way to cook the long rice sticks and can be found in almost any snack stand here in Korea.

But there is another way to cook deokkbokki - the sweet, savory way. My korean friend, BB, taught me how to fix this snack. She served it to me one time as a snack and I was fascinated with the sweet and savory flavor with a hint of garlicky goodness. Now let me share with you how to make this quick snack.

First you need to assemble these ingredients:
Deokkbokki (korean rice cakes), vienna sausages, carrots, dried mushrooms, garlic, onion and leeks or celery. Not in the picture are cooking syrup (or Karo syrup or any pancake syrup), cooking oil and dark soy sauce.

For the rice cakes, if you buy them fresh like what I get from the local korean market, there's nothing to do with them before cooking. But if you get them from the grocery chiller, chances are they would be hard and stuck to each other.


The key is to soak them in hot water for about 30 minutes. They would soften and be easy to pull apart.


Next, prep the ingredients by cutting the carrots and the celery/leeks into thin sticks. Slice the onion thinly. Mince the garlic. Soak the dried mushrooms in hot water to reconstitute them. Cut the vienna sausage diagonally, lengthwise. (For measurements, you would need half a carrot, half an onion, one celery rib or 2 leek stalks, 1 cup of dried mushrooms, 1 tbsp of garlic and 1 cup of vienna sausage.)

Now take a deep pan or a wok and add about 2 tbsps of cooking oil. Drain the rice sticks and place into the pan. Stir-fry for about half a minute and then add the vegetables (carrots and celery). Stir-fry for about a minute. Drain the mushrooms, squeeze them before adding to the pan. Add the vienna sausage last. Stirfry for about 1 minute. Now add the minced garlic and mix until everything is well-coated.

Now add about 4 tbsps of soy sauce and then 2 tbsps of cooking syrup. Mix everything and let simmer for a minute or two. If it looks too dry, add more syrup. If it is too wet, just let it simmer longer. It'll be ready when the sauce has coated everything in the pan. Cooking time is between 10 to 15 minutes total. I told you this was a quick and easy snack to fix.


To serve, just scoop the deokkbokki on to a plate and serve with toothpicks (like what koreans do). Take a piece of deokkbokki, eat. Then take a sausage, eat. Take a piece of deokkbokki, eat. Then follow it up with with a veggie or a mushroom. You get the picture. Before long, you'll be cleaning up the plate and licking the sweet-savory sauce in the end. (Not saying that's what I did but...) :)

Saturday, January 31, 2009

Grilled Veggies with Pesto Spaghetti


For the past couple of days, we've been dining on hubby's wonderful barbeque'd ribs. We had some friends over last Friday (a former officemate who wanted to sample Bill's BBQ Ribs for a long time). So Hubby grilled about 5 kilos of pork (large ribs, baby back ribs and tenderloins). I made garlic fried rice, veggie kebabs, potato salad, mashed potatoes and buttered corn.

After several meals of grilled porky delight, I wanted something different. I remembered that we had some sticks of veggie kebab leftovers. In the kebabs, I've skewered zucchini rounds, oyster mushrooms and red & yellow bell peppers. The mushrooms, the oyster kind, kinda dried out because of the grilling. So I took those veggies out of the fridge, spied a jar of pesto and took that out too.


While my pasta was cooking, I added the mushrooms to a half a cup of simmering water in a deep pan. When the mushrooms reconstituted, I thinly sliced the zucchini in half-moon shapes and chopped the bell pepper. I added those to the pan too. Then I saw the water was almost gone so I added another half cup of water to the pan. Then I took my trusty pesto jar and added 2 tablespoons of pesto to the pan. I swirled everything around to get the veggies get well-coated with pesto.


By this time my pasta was cooked and I thoroughly drained it. I just dumped the pasta in the pan and mixed everything up. Then I ladled half of it on a plate and sprinkled grated Parmesan cheese all over the hot pasta. First taste was a bite of savory goodness. The mushrooms were tender and there was a hint of smoky aftertaste in every bite. It didn't take long for me to finish the plate. And the great thing is that I have half a pan of leftover for snacking tonight. :)

Monday, January 26, 2009

Dumpling Recipes (Chinese and Japanese)

Dumplings are a favorite of many. They come in different shapes and sizes. Filipinos have their "siomai" (from our chinese past - in pork, chicken and beef), Koreans have their "mandu" (in meat or spicy kimchi filling), Japanese have their gyoza (fried and them steamed, or vise-versa), and the Chinese with their 1000 and 1 versions of the dumplings (savory and sweet).


Here are my recipes.

Shrimp and Chives Dumplings (Chinese Dumplings)
1/2 cup of fresh shrimp, peeled
1 bunch of chives (maybe a cup and half)
1/2 medium onion, minced
1/2 kilo (1 pound) ground pork
1 egg
2 tbsp oyster sauce
1 tsp salt
1 tsp pepper
2 tbsp flour
*dumpling wrappers

1. Wash the chives very well, drain and then chop into inch pieces. Put in a large mixing bowl.

2. Coarsly chop the shrimp and add to the mixing bowl as well.

3. Add the rest of the ingredients, except for the dumpling wrappers. Mix very well.


4. Put a tablespoon of filling on a wrapper, wet the edges of the wrapper, fold and seal the dumplings into a half-moon or make pleats into the edges to make it pretty.

5. Have a steamer ready and steam the dumplings for 20 minutes. Note: to make the dumplings not stick to the pan, line the steamer with cabbage leaves and put the dumplings on top of it.


6. Serve the hot dumplings with soy sauce as a dipping sauce. For variations, you can mix the following to the soy sauce [a little vinegar, chili oil, a squeeze of lemon, etc].


Japanese Gyoza Dumplings


1/2 chinese cabbage, washed and shredded
1/4 cup salt
1/2 kilo ground meat (chicken or pork)
1/2 carrot, coarsely grated
1/2 medium onion, finely minced
1 tbsp oyster sauce
1 tsp salt
1 tsp pepper
1 egg
2 tbsp cornstarch
*oil for frying

1. In a large bowl, mix cabbage with salt and set aside for 30 minutes. You will see that the salt will cause a lot of water to come out of the cabbage.

2. Dump the cabbage into a colander, wash under running water and with your hands, grab a handful and try to squeeze most of the water out. Do this with the rest of the cabbage until you have used up the entire lot. Put the squeezed cabbage in a large mixing bowl.

3. Add the ground meat, grated carrot, minced onion, oyster sauce, salt & pepper, oyster sauce, egg and cornstarch. Mix the filling very well.

4. Make the dumplings, (see the video of Billy making one in my previous post).

5. To cook the dumplings, heat some oil on a frying pan. Add some dumplings and fry for about a minute, when one side of the dumpling is golden-brown, turn over and fry it for about a minute. Add 1/2 cup of water to the pan and immediately cover the pan. Let the dumpling steam-fry until all the water evaporates.*

6. Take out the cooked dumplings and serve with soy sauce as dipping sauce.

*Another way to cook this is to steam the dumplings first and then fry it later. I do this to the dumplings I have frozen in my fridge and they taste just as great.